

Irresistible 3-Ingredient Oreo Truffles: The Easiest No-Bake Dessert!
Searching for an effortlessly delicious dessert that requires minimal ingredients and no baking? Look no further! These white chocolate Oreo truffles are incredibly simple to make, yet they deliver maximum flavor and delight. Perfect for any occasion, these 3-ingredient Oreo balls are guaranteed to become a new favorite in your recipe collection.

There’s a special kind of joy that comes from creating delectable sweets, especially during festive seasons or when a craving strikes. While my kitchen sometimes leans towards savory dishes, I find myself constantly drawn to the sweet side of cooking. The process of making cookies, cakes, and treats is simply fun, and it’s even better when the recipe simplifies the joy without compromising on taste. That’s precisely what these remarkable Oreo truffles offer – a delightful experience from start to finish!
Why These 3-Ingredient Oreo Truffles Are a Must-Try
Who can resist the classic allure of Oreo cookies? Their iconic combination of deep, dark chocolate wafers hugging a luscious, creamy icing has made them a beloved treat worldwide. While delicious on their own, Oreos truly shine when transformed into other desserts. From indulgent Oreo ice cream to rich Oreo cheesecakes, the versatility of this cookie knows no bounds. These homemade Oreo truffles capture that same magical essence, reminiscent of a decadent cheesecake, but with an unparalleled ease.
What truly sets this recipe apart is its incredible simplicity: it calls for only three core ingredients! This makes it an ideal solution for busy individuals, last-minute party preparations, or anyone seeking a quick, satisfying sweet fix without the complexities of traditional baking. You don’t need a culinary degree or an extensive list of obscure items; just three humble ingredients come together to create something truly extraordinary.
The Ultimate Easy Dessert for Every Occasion
Whether you’re planning a holiday feast, preparing treats for a school bake sale, or simply want a delightful snack for movie night, these Oreo truffles are the perfect choice. Their no-bake nature means less time fussing in the kitchen and more time enjoying the company of loved ones or savoring a moment of quiet indulgence. They are also wonderfully customizable, allowing you to tailor them to different tastes and aesthetics, making them suitable for any event, from elegant gatherings to casual family get-togethers. They’re also a fantastic edible gift idea, beautifully packaged and sure to impress.

Gathering Your Simple Ingredients for Oreo Truffles
The beauty of this recipe truly lies in its minimal and accessible ingredient list. You likely have most of these on hand already! Here’s what you’ll need to create these heavenly no-bake treats:
- Oreo Cookies: One full package, typically containing 36 standard cookies. The original chocolate and cream flavor provides the classic truffle base, but feel free to explore other Oreo varieties like Golden, Mint, or Peanut Butter for exciting flavor variations. Ensure you use the entire cookie, including the creamy filling!
- Cream Cheese: One 8-ounce block of full-fat cream cheese. This is the magic ingredient that binds the cookie crumbs and gives the truffles their rich, tangy, and irresistibly creamy texture, much like a dense cheesecake. It is absolutely crucial that your cream cheese is at room temperature before you begin.
- Chocolate: 8 ounces of high-quality melting chocolate. You can opt for white chocolate for a striking contrast and sweet coating, or dark chocolate for a richer, more intense flavor. Using good quality chocolate will ensure a smooth melt, easy dipping, and a beautiful, shiny finish. Chocolate chips, baking bars, or melting wafers all work wonderfully.
Ingredient Spotlight: Room Temperature Cream Cheese! This step is non-negotiable for achieving a silky-smooth truffle mixture. Cold cream cheese will be firm and difficult to blend, resulting in lumps in your mixture. For best results, take your cream cheese out of the refrigerator at least an hour or two before you plan to start, allowing it to soften naturally. This ensures it creams seamlessly with the crushed Oreos.
Crafting Your Perfect 3-Ingredient Oreo Truffles: A Detailed Guide
Creating these delightful truffles is a remarkably easy and enjoyable process. Here’s a step-by-step breakdown to ensure your truffles turn out perfectly smooth, decadent, and utterly irresistible:
Step 1: Transforming Oreos into Fine Crumbs
The first crucial step is to crush your Oreo cookies into fine, uniform crumbs. This forms the essential base of your truffles, so consistency is key for the best texture. For optimal results, a food processor is highly recommended. Simply place the entire package of Oreo cookies (yes, the filling too!) into the food processor. Pulse the cookies until they are reduced to fine, even crumbs. Be careful not to over-process them into a paste; you want a crumbly texture.
No food processor? No problem! You can easily achieve excellent crumbs using a large, sturdy Ziploc bag and a rolling pin. Place the Oreos in the bag, seal it tightly, and then use a rolling pin to firmly and thoroughly crush them until they resemble fine crumbs. This method requires a bit more elbow grease, but it’s just as effective.
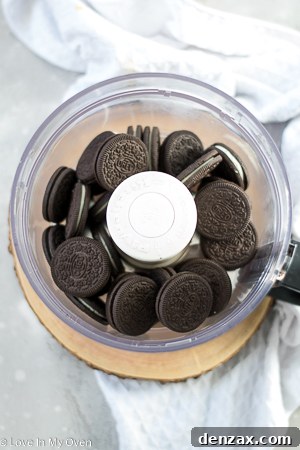
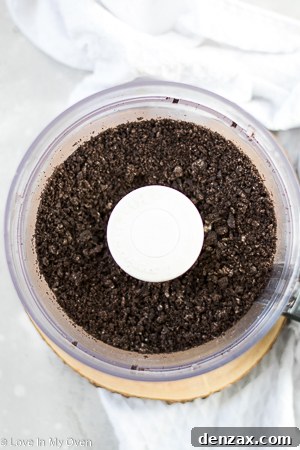
Step 2: Expertly Combining with Cream Cheese
Once your Oreos are perfectly crumbed, it’s time to incorporate the softened cream cheese. If you’re using a food processor, add the room-temperature cream cheese, cut into a few smaller pieces, to the Oreo crumbs. Pulse lightly and intermittently until the mixture is thoroughly combined and forms a thick, uniform, and pliable “dough.” It should come together and begin to pull away from the sides of the food processor bowl.
If you crushed the Oreos by hand, transfer the crumbs to a large mixing bowl. Add the softened cream cheese and use a sturdy wooden spoon or clean hands to mix and knead until the cream cheese is completely incorporated into the Oreo crumbs. The resulting mixture should be dense, cohesive, and easy to mold.
Now, here’s a crucial tip: resist the temptation to roll the truffles immediately! The mixture needs time to firm up properly. Transfer the bowl with the truffle mixture into the refrigerator and chill for at least one hour. This chilling period is essential; attempting to roll the truffles too soon will result in a sticky, unmanageable mess. Patience here will be rewarded with perfectly shaped truffles!
Step 3: Rolling Uniform Truffle Balls and Freezing
After the mixture has chilled for at least an hour, it will be much firmer and easier to work with. Use a small cookie scoop (a 1-tablespoon size works perfectly for bite-sized truffles) to portion out even amounts of the mixture. Gently roll each portion between your palms to form smooth, uniform balls. Place the finished truffle balls on a baking sheet lined with parchment paper. This prevents sticking and makes cleanup a breeze.
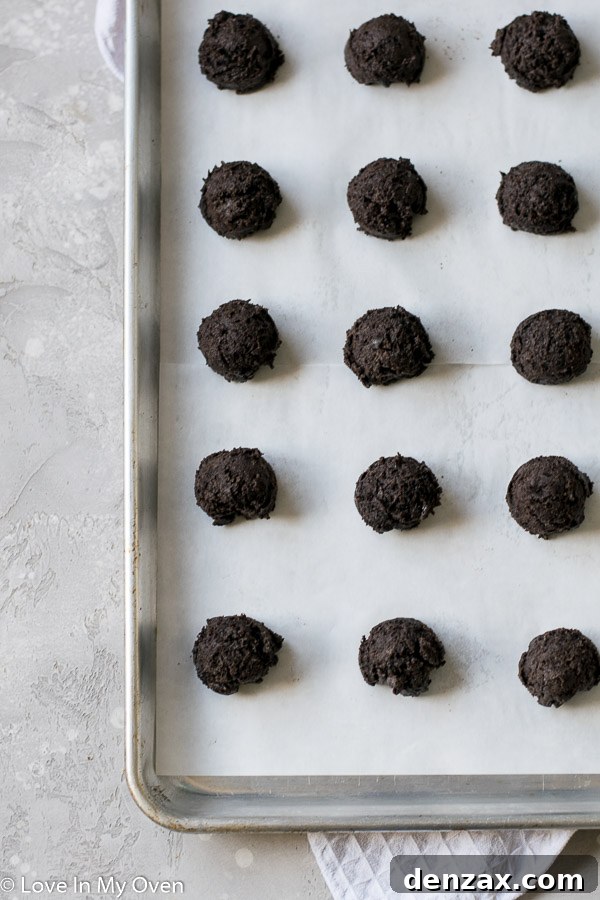
Once all the truffle balls are rolled, return the baking sheet to the freezer for another hour. This secondary freezing step is critically important for two key reasons: it ensures the truffles are firm enough to withstand the dipping process without falling apart, and it helps the chocolate coating set almost instantly upon contact, resulting in a beautiful, smooth, and crack-free finish.
Step 4: Mastering the Chocolate Coating Melt
While your truffle balls are firming up in the freezer, prepare your luscious chocolate coating. You have a couple of reliable methods for melting your white or dark chocolate:
- Double Boiler Method: Place your chopped chocolate in a heatproof bowl. Set this bowl over a saucepan containing about an inch or two of simmering water, ensuring the bottom of the bowl does not touch the water. The steam will gently melt the chocolate. Stir continuously with a rubber spatula until the chocolate is completely smooth and creamy. This method provides controlled, even heat, reducing the risk of burning.
- Microwave Method: Place the chopped chocolate in a microwave-safe bowl. Heat in short intervals of 25-30 seconds, stirring thoroughly after each interval. This technique is vital to prevent the chocolate from overheating, seizing (becoming thick and grainy), or burning. Continue heating and stirring until the chocolate is fully melted, shiny, and has a silky, dip-ready consistency.
Pro Tip: If you plan to decorate your truffles with additional toppings like sprinkles, crushed candy canes, or nuts, have them readily accessible before you start dipping. The chocolate will begin to harden almost immediately once it touches the cold truffles from the freezer, so you’ll need to work quickly with your garnishes.
Step 5: Dipping, Decorating, and Setting Your Truffles
Once your truffle balls are thoroughly frozen and your chocolate is perfectly melted, it’s time for the final, most satisfying step. Retrieve the frozen truffle balls from the freezer. Using a regular dinner fork or a specialized chocolate dipping fork (these can be very helpful for a cleaner dip), gently drop one truffle into the melted chocolate. Fully coat the truffle, then lift it out, allowing any excess chocolate to drip off by gently tapping the fork against the edge of the bowl. This ensures a thin, even coating.
Carefully return the dipped truffle to the parchment-lined baking sheet. Immediately after dipping (and while the chocolate is still wet), sprinkle your desired garnishes over the truffle. This could be colorful sprinkles, festive crushed candy canes, finely chopped nuts, a dusting of cocoa powder, or even a dash of flaky sea salt. Work swiftly, as the chocolate will set very quickly due to the coldness of the truffle.
Allow all the chocolate-coated truffles to fully set. This can be done at room temperature, or in the refrigerator for an even faster set time. Once the chocolate is firm and no longer sticky, your irresistible 3-ingredient Oreo truffles are ready to be served and enjoyed!

Storage, Shelf Life, and Serving Suggestions
Due to the cream cheese content, it is essential to store these delightful Oreo truffles in the refrigerator. Place them in an airtight container, and they will maintain their freshness and delicious texture for up to one week. If you’re serving them at a party or gathering, they can safely be left out at room temperature for a few hours without compromising quality.
For longer storage, these truffles freeze beautifully! Arrange the fully set truffles in a single layer on a baking sheet and freeze until completely solid. Once frozen, transfer them to a freezer-safe airtight container or bag. They can be stored this way for up to 2-3 months. Thaw them in the refrigerator for a softer texture, or enjoy them directly from the freezer for a wonderfully chewy, cold treat.
Elevate Your Truffles: Drizzles and Creative Customizations
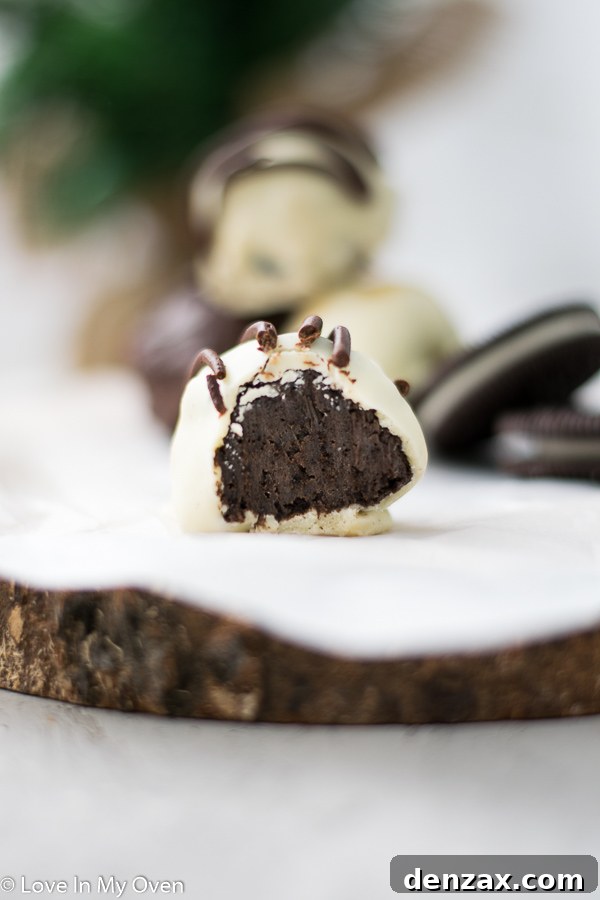
A simple chocolate drizzle can add an elegant touch and an extra layer of visual appeal to your finished truffles. Once your primary chocolate coating has fully hardened, melt a small amount of additional chocolate (a contrasting color like dark chocolate over white, or vice-versa, works beautifully) in the microwave. Transfer the melted chocolate to a small sandwich bag, snip off a very tiny corner of the bag, and gently squeeze it in a fine stream over the tops of your truffles. Allow this drizzle to set completely before serving.
Exciting Flavor Variations and Topping Ideas:
- Explore Oreo Flavors: Don’t limit yourself to classic Oreos! Try Golden Oreos with white chocolate and lemon zest, Mint Oreos with dark chocolate for a refreshing twist, or Peanut Butter Oreos with milk chocolate for an extra nutty flavor.
- Alternative Chocolate Coatings: Experiment with different types of chocolate for dipping, such as milk chocolate, semi-sweet chocolate, or even brightly colored candy melts to match a party theme.
- Mix-ins for the Core: Before rolling the truffle mixture, try adding mini chocolate chips, finely chopped toasted nuts (like pecans or walnuts), a pinch of espresso powder for depth, or a few drops of peppermint or almond extract for an extra layer of flavor.
- Gourmet Toppings: Beyond standard sprinkles, consider a dusting of high-quality cocoa powder, finely crushed pretzels for a sweet and salty crunch, toasted shredded coconut, a sprinkle of flaky sea salt, or even finely chopped dehydrated fruit for a sophisticated finish.

Frequently Asked Questions About These Oreo Truffles
- Can I use low-fat cream cheese for this recipe?
- While it might be tempting, full-fat cream cheese is highly recommended for the best results. It provides the essential richness, creaminess, and binding power needed for perfectly textured truffles. Low-fat versions may result in a less desirable texture and consistency.
- Do I need to remove the filling from the Oreos before crushing them?
- Absolutely not! Keep the creamy white filling intact. It’s a crucial component that contributes significantly to both the flavor and the binding properties of the truffle mixture, making it truly a “3-ingredient” recipe.
- How long do these homemade Oreo truffles last?
- When stored properly in an airtight container in the refrigerator, these truffles will remain fresh and delicious for up to one week. For extended enjoyment, they can be frozen for up to 2-3 months.
- Can I use different types of chocolate for the outer coating?
- Yes, you certainly can! White chocolate is a popular choice for its visual contrast and sweetness, but dark chocolate or milk chocolate are excellent alternatives. You can even use colorful candy melts to customize your truffles for specific holidays or events.
- Are these truffles suitable for individuals with gluten sensitivities?
- Standard Oreo cookies contain gluten. However, many brands now offer gluten-free sandwich cookies that are very similar to Oreos. By using a certified gluten-free alternative, you can easily adapt this recipe to be gluten-free.
- Can children help make these Oreo truffles?
- Definitely! This recipe is fantastic for involving kids in the kitchen. They’ll love crushing the Oreos (especially with a rolling pin) and, even more so, rolling the truffle balls and decorating them with sprinkles. It’s a fun, mess-friendly activity!
Final Thoughts on This Delightful No-Bake Treat
These 3-ingredient Oreo truffles are more than just an easy recipe; they are a testament to how simple, readily available ingredients can be transformed into something truly extraordinary and memorable. Whether you’re a seasoned home cook or just starting your culinary journey, you’ll find immense joy in preparing these decadent, no-bake treats. They are a super easy addition to your holiday dessert repertoire, a perfect last-minute party contribution, or simply a fantastic way to satisfy a sudden sweet craving. Give them a try – your taste buds, and your guests, will undoubtedly thank you!
More Easy Treats from Our Kitchen You’ll Love:
- 3 ingredient chocolate mug cake
- flourless chocolate cake
- giant peanut butter cup
- salted caramel almond clusters
Print Recipe

3 Ingredient Oreo Truffles
5 Stars 4 Stars 3 Stars 2 Stars 1 Star
5 from 4 reviews
- Author: Katherine | Love In My Oven
Total Time: 2 hours
Yield: 20–22 truffles 1x
Description
These white chocolate Oreo balls couldn’t be easier! All you need is a few ingredients for this easy Oreo dessert. You’ll love these 3 ingredient Oreo truffles!
Ingredients
- 1 package Oreo cookies (36 cookies)
- 8 oz block full-fat cream cheese, room temperature
- 8 oz white chocolate, chopped*
- optional: crushed candy canes, sprinkles, nuts, additional chocolate, etc for decorating
Instructions
- Place the Oreo cookies (filling and all) in a food processor and blitz until small crumbs are formed. If you don’t have a food processor, you can use a large Ziploc bag and a rolling pin to crush them. Once the cookies are crushed, add the cream cheese, in pieces, to the food processor, and pulse lightly until combined, OR stir in the cream cheese by hand using a wooden spoon. Once the mixture is thoroughly combined, place it into the fridge for an hour to firm up. Do not try to roll the truffles right away or you’ll end up with a hot mess!
- Using a small cookie scoop, form small, even-sized balls out of the mixture, placing them on a parchment-lined baking sheet. Freeze the balls on the cookie tray for 1 hour. Prior to removing the balls from the freezer, melt the white chocolate in either a double boiler, or in a microwave-safe bowl, heating it in 30 second increments and stirring after each interval until shiny and smooth.
- Using a fork or a chocolate dipping fork, dunk the truffles in the melted chocolate, shaking off excess chocolate and returning them to the baking sheet. Garnish with sprinkles or crushed candy canes immediately before the chocolate sets.. If drizzling with additional chocolate, wait until the truffle has hardened before drizzling. Serve immediately!
The truffles will be fine at room temperature for a few hours, after which they should be stored in the fridge or freezer in an airtight container.
Notes
*You can also use dark chocolate if you’d prefer this to white chocolate
- Prep Time: 20 minutes
- Category: desserts
- Method: no-bake
- Cuisine: american