

Discover the delightful world of homemade treats with these enchanting Vanilla Bean Christmas Cookie Pops! Perfect for holiday gatherings or festive gifting, these cookie lollipops are incredibly easy to make and an absolute joy to eat.

Delightful Vanilla Bean Cookie Pops: Your Guide to Festive Treats on a Stick
There’s an undeniable charm and a touch of whimsy when treats come on a stick. Imagine the delight of biting into a perfectly baked cookie, made even more fun when presented as a lollipop! While cake pops have certainly enjoyed their time in the spotlight, it’s time to shine a light on their equally enchanting cousins: cookie pops. These delightful creations elevate the simple act of enjoying a cookie into an experience, making them perfect for celebrations, gifts, or simply adding a dash of magic to your day, especially during the festive holiday season.
Transforming a classic cookie into a “pop” might sound like an added layer of complexity to your baking routine, but with a few clever tips and a sprinkle of patience, it’s a surprisingly achievable and immensely rewarding endeavor. This guide will walk you through everything you need to know to create stunning vanilla bean cookie pops that are sure to impress. Whether you’re aiming for a batch of festive Christmas cookie pops or planning a unique dessert for a wedding, baby shower, or birthday party, these stick-ified delights are wonderfully versatile and endlessly customizable.
Essential Tips for Crafting Perfect Cookie Pops
Embarking on the journey of making cookie pops is straightforward when armed with the right knowledge. Over time, I’ve gathered some indispensable insights that will ensure your cookie pops are not only delicious but also structurally sound and easy to handle. Here are my top tips for creating beautiful and stable vanilla bean cookie pops:
1. Choose a Sturdy Cookie Dough Base
The foundation of any great cookie pop is a robust cookie dough. You’ll want a dough that holds its shape well during baking and can securely embrace a stick. A classic sugar cookie dough is an excellent choice due to its inherent stability. Similarly, a gingerbread cookie dough works wonderfully. The key is to avoid doughs that are excessively soft or crumbly, as they won’t provide the necessary structure to keep the stick in place. A firm dough ensures your cookie pops can withstand handling and decorating without falling apart.
2. Roll Dough to an Optimal Thickness
Thickness is paramount when it comes to cookie pops. Aim for your cookie dough to be rolled out to approximately 1/2 inch (about 1.25 cm). If the dough is too thin, the stick will likely struggle to find its center, potentially bursting through the top or bottom of the cookie. This ideal thickness provides enough “meat” for the stick to be firmly embedded without compromising the cookie’s integrity. While not strictly necessary, tools like a dough guide or spacers for your rolling pin can be incredibly helpful in achieving consistent thickness across all your cookies, ensuring uniform results and easier stick insertion.
3. Allow Ample Space on Baking Trays
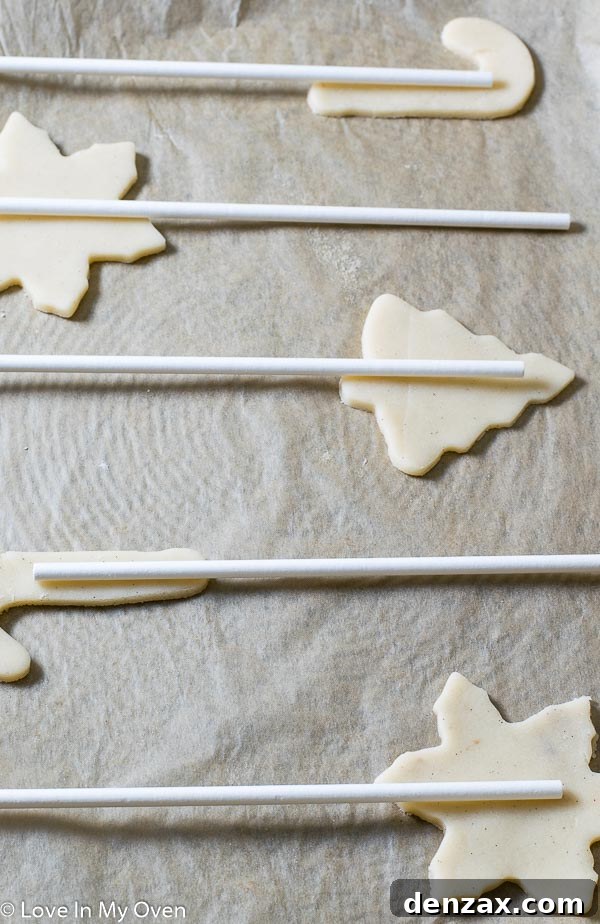
One common mistake is overcrowding your baking sheets. For cookie pops, ample spacing is crucial. You’ll need enough room around each cookie to insert the stick as soon as it comes out of the oven, while the cookie is still warm and pliable. This often means using multiple baking trays, but it’s a small trade-off for perfectly assembled cookie pops. Spreading them out also allows for even baking and prevents cookies from merging together as they expand, which could complicate stick insertion.
More Expert Advice for Flawless Cookie Pops
Beyond the initial preparation, a few more details can make all the difference in your cookie pop success story:
4. Select the Right Sticks
The type of stick you use is more important than you might think. Opt for sticks that are relatively thin yet sturdy. I’ve found that standard lollipop sticks work best, as some “cookie sticks” can be surprisingly thick, making insertion difficult and increasing the risk of cracking your freshly baked cookies. Thin sticks slide in smoothly and secure well within the cookie’s soft interior without causing damage.
5. Pre-poke with a Toothpick
To facilitate effortless stick insertion, use a toothpick to gently poke an initial pilot hole at the bottom center of each warm cookie immediately after it comes out of the oven. This small starter hole guides the thicker cookie stick, allowing it to slide into the still-soft cookie with ease and minimal risk of breakage. This step creates a cleaner entry point and helps prevent the cookie from splitting as you push the stick through.
6. Allow Complete Cooling Before Handling
This tip is paramount for the structural integrity of your cookie pops. Once the sticks are inserted, resist the urge to move or touch the cookies until they are completely cooled to room temperature. The cooling process allows the soft, warm cookie dough to firm up and mold securely around the stick, creating a strong bond. Premature handling can dislodge the stick or cause the cookie to break, leading to frustration. Once cooled, carefully transfer them to a wire rack using a spatula, avoiding lifting them by the stick.

Don’t be intimidated by these steps; once you get the hang of it, creating these charming cookie pops is truly quite simple and incredibly rewarding!
The Magic of Vanilla Bean Paste: Elevating Your Cookie Pops
For these Vanilla Bean Cookie Pops, the star flavor is, naturally, vanilla. While vanilla extract is a perfectly acceptable alternative, vanilla bean paste takes the flavor profile to an entirely new level. The paste not only imparts a richer, more intense vanilla flavor but also adds those beautiful, distinct specks of vanilla bean throughout the cookie. These tiny specks give a plain sugar cookie an extra touch of sophistication and visual appeal, signaling a treat that’s a cut above the rest. I personally adore Nielsen-Massey vanilla bean paste and often find myself wanting to add it to almost everything I bake!
If vanilla bean paste isn’t readily available or you prefer to use what you have on hand, don’t fret! The recipe card below provides instructions for using pure vanilla extract, ensuring your cookie pops are still bursting with delicious vanilla flavor. The key is using high-quality vanilla, no matter the form.
A Dough That Works With You: No Chilling Required!
One of the best features of this particular sugar cookie dough recipe is its incredible versatility and ease of use. It boasts the perfect consistency – it’s pliable, doesn’t crumble easily, and most wonderfully, it doesn’t require chilling! This means you can whip up a batch and get straight to rolling and cutting your festive shapes, saving you precious time, especially during busy holiday preparations. Furthermore, if you like to plan ahead, this dough is an excellent candidate for make-ahead baking. It can be prepared in advance and stored in the fridge for up to 5 days, or even frozen for up to 2 months, ready whenever the cookie pop craving strikes.

Endless Possibilities: Beyond Christmas Cookie Pops
While the holiday season naturally lends itself to creating festive Christmas cookie pops, the potential for these delightful treats extends far beyond December. Imagine elegant vanilla bean cookie pops for a wedding reception, whimsical designs for a baby shower, or vibrant, personalized cookies for a birthday party. Their portability and individual serving size make them an ideal choice for any celebration where unique, delicious, and fun treats are desired. The possibilities for decoration are as limitless as your imagination, allowing you to tailor them to any theme or occasion.
As the holiday season swiftly approaches its end, it’s bittersweet to think that this might be my last holiday cookie recipe to share this year. Where does the time go? Nevertheless, these vanilla bean cookie pops have brought immense joy and a touch of festive cheer to our home, and I hope they do the same for yours!

For even more delightful baking ideas, especially if you’re looking for other Christmas cookie ideas, explore these fantastic recipes:
- Mint Chocolate Candy Cane Cookies
- Double Chocolate Peppermint Biscotti
- Chocolate Caramel Shortbread Bars
Vanilla Bean Cookie Pops Recipe
Author: Katherine
Total Time: 2 hours 0 minutes (including cooling)
Yield: 40-45 cookies
Print Recipe
Description
These vanilla bean Christmas cookie pops are a delightful treat, easy to make, and so much fun to eat. Perfect for gifting or a festive display!
Ingredients
For the Cookies:
- 3 cups all-purpose flour
- 2 tsp baking powder
- 1/2 tsp salt
- 1 cup unsalted butter, softened to room temperature
- 1 cup sugar
- 1 large egg
- 1 tsp vanilla bean paste*
For the Royal Icing:
- 1/2 cup egg white substitute (about 3 egg whites)
- 4 cups powdered sugar
- 1 tsp lemon juice
Instructions
- Preheat your oven to 350°F (175°C) and line 2 large baking sheets with parchment paper or silicone baking mats.
- In a medium mixing bowl, whisk together the all-purpose flour, baking powder, and salt until well combined. Set aside.
- In the bowl of a stand mixer fitted with the paddle attachment (or using an electric hand mixer), beat the softened butter on high speed until it becomes light and fluffy, about 2-3 minutes.
- Add the granulated sugar and continue to beat until creamy, then mix in the egg and vanilla bean paste (or extract) until just combined. Be careful not to overmix.
- With the mixer running on low speed, gradually add the dry flour mixture to the wet ingredients. Mix only until a soft dough begins to form and clumps together. Stop mixing as soon as this consistency is reached to avoid tough cookies.
- Lightly flour a clean surface. Scoop the dough onto it and gently pack any loose pieces together to form a cohesive ball. Roll out the dough to a consistent 1/2-inch thickness. Cut out your desired cookie shapes using cookie cutters.
- Carefully place the cut-out cookies on the prepared baking sheets, ensuring generous spacing between each cookie (at least one cookie’s width apart). This is crucial to allow room for inserting the sticks.
- Bake the cookies for 10-12 minutes, or until the edges are just beginning to turn a very light golden brown. The centers of the cookies should still be quite soft.
- Remove the baking sheets from the oven. While the cookies are still hot on the pan, immediately and carefully poke a toothpick into the middle of the bottom edge of each cookie to create a pilot hole. Then, quickly insert a lollipop stick into the hole, pushing it about halfway into the cookie.
- Allow the cookies to cool mostly on the baking sheets until they are firm enough to handle without breaking. Then, using a spatula to support the cookie (never lift by the stick at this stage), transfer them to a wire rack to cool completely.
- Once the cookies are fully cooled, prepare the royal icing. In a clean mixing bowl, using an electric mixer, beat the egg white substitute on high speed until it starts to foam.
- Gradually add the powdered sugar, one cup at a time, beating until the icing achieves a thick but still pourable consistency***. Finally, add the lemon juice and mix until just combined.
- If you plan to use multiple colors of icing, divide the prepared royal icing into separate bowls and add your desired food coloring (and flavorings, if using). Transfer the colored icing to piping bags or squeeze bottles. Use immediately for decorating.
- Decorate your cookie pops as desired. Allow the icing to fully set and harden on the cookies (this can take several hours, depending on humidity and icing thickness) before storing or serving.
Storage: Decorated cookie pops will stay fresh at room temperature for up to 1 week when stored in an airtight container. For longer storage, they can be kept in the freezer for up to 2 months.
Notes
- *If vanilla bean paste is unavailable or preferred, substitute with 1 teaspoon of pure vanilla extract.
- **If you don’t plan to roll out and cut your dough immediately, wrap it tightly in plastic wrap and refrigerate for up to 5 days. For longer storage, wrap it in plastic wrap and then place it in a tightly sealed freezer-safe bag, freezing for up to 2 months. Thaw in the refrigerator before use.
- ***The consistency of your royal icing is key for decorating. For “flooding” cookies (filling in large areas), you’ll want a slightly runnier consistency. For piping fine details and outlines, a stiffer icing is required. Adjust by adding more powdered sugar for a thicker icing or a few drops of water (carefully, one at a time) for a thinner consistency.
Sugar cookie recipe originally adapted from Bake @ 350.
- Prep Time: 45 minutes
- Cook Time: 10-12 minutes per batch (active baking)
Did you make this recipe?
We’d love to see your creations! Tag @loveinmyoven on Instagram and use the hashtag #loveinmyoven to share your delightful cookie pops with us!
Need more holiday treat inspiration?
Discover our delicious Holiday Twix Bars recipe here!